
My master shower was ugly. The un-cleanable and un-bleachable mold would mock me every day telling me that it was there to stay and nothing I could do would get rid of it! I tried brushes, sponges, steel wool, soft scrub, bleach mixtures, but it was still there. Day after day. Shower after shower.
Enough I said! I finally decided to just get rid of it all and tile the shower. I ripped apart the gold door trim, scored the silicone corners with a utility knife, and systematically removed the acrylic shower panels one by one.
When I was down to the studs I took a trip to the local hardware store in search of tile and backer board to put it all back together.
That’s when I came across the Schluter Shower System.
The salesman told me I don’t have to install a concrete backer board. What? No concrete backer?
He also told me they make a shower base that is self leveling. What? I don’t have to slope mortar by hand?
And it’s completely waterproof? I asked. Yes, he said. Completely waterproof.
I though it sounded too good to be true! Yes, he said. It’s all true. I ultimately realized that it’s much easier for someone like me who doesn’t install showers every day to use a system like Schluter.
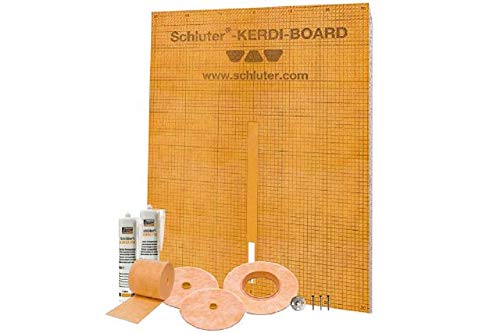
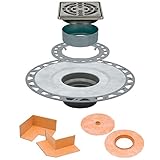
The associate helped me get everything I needed together. Kerdi board. Kerdi corners. Kerdi band. Kerdi mortar. Pre-mixed grout with sealant. The prefabricated shower floor. Even a preformed curb and niche to put my shampoo and soap. They had all the accessories I needed.

When I got to the checkout counter the total ended up being more than than I expected. I thought to myself: This costs too much. Maybe I’ll go back to the traditional way of cement backer board and make my own shower pan.
Then I thought about all the time I’d have to put in, headaches, what if I got it wrong and it started leaking? Then I’d have an even bigger problem on my hands.
I finally realized that yes, even though the Schluter Shower System is more expensive, it will save me headaches and time. My time is valuable so it may actually make sense when I also put a dollar amount to my time.
I justified the cost because not only because of the amount of time it would save me, but also the peace of mind from a solid product.
What you can expect to read:
Schluter Systems Kerdi Products
| Image | Title | Price | Prime | Buy |
|---|---|---|---|---|
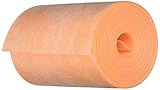 | SCHLUTER KERDI-BAND - 5" X 33' | PrimeEligible | Buy Now | |
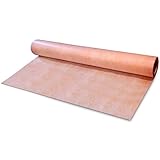 | Waterproof Membrane 3.3 ft x 33 ft / 108 Square Feet - 8mils Thick - Waterproofing Polyethylene Fabric for Shower Walls, Bathroom Floors, Sauna, Steam Room (3.3 ft x 33 ft (1)) | PrimeEligible | Buy Now | |
 | Schluter Kerdi Drain Stainless PVC Version | PrimeEligible | Buy Now | |
 | KERDI-BOARD-ZT Washers for Installation of KERDI-BOARD Panels - 1-1/4" (Quantity: 100) | PrimeEligible | Buy Now | |
 | Schluter Ditra 1/8" Underlayment 54sqft | PrimeEligible | Buy Now | |
 | Schluter KERDI-Board-SN: Shower Niche (with Shelf) 12"x28" (1) | PrimeEligible | Buy Now | |
 | SCHLUTER KERDI TROWEL - 1/8in x 1/8 in Square Notch | PrimeEligible | Buy Now |
What is KERDI Board?
KERDI Board is a waterproof polystyrene panel that you can mount directly to studs or over drywall for shower and bathroom applications. Once mounted and bonded together, you can install ceramic or stone tile directly to it.
The grid makes it easy to cut with a utility knife and it’s easier to cut than drywall. It creates a completely waterproof system, saves time, and gives peace of mind.
Is KERDI Better than Cement Board?
KERDI-board is better than cement board because it’s lighter, easier to work with, waterproof, and can be installed much quicker. Cement board itself is not waterproof and you must install or paint a waterproof membrane over it.
KERDI will cost more up front. But it saves time, reduces problems, and is completely waterproof.
How to Join Kerdi Board to Drywall
1. Cut the KERDI-Board to the correct dimensions for your work area
2. Clean the drywall with a wet sponge to remove dust and dirt
3. Using a notched trowel, add thin-set to the wall and cover the entire application area
4. Place the panel on the wall and push to fully embed
5. Minimize the gap between any adjacent panels
6. Let dry
Kerdi Board Installation
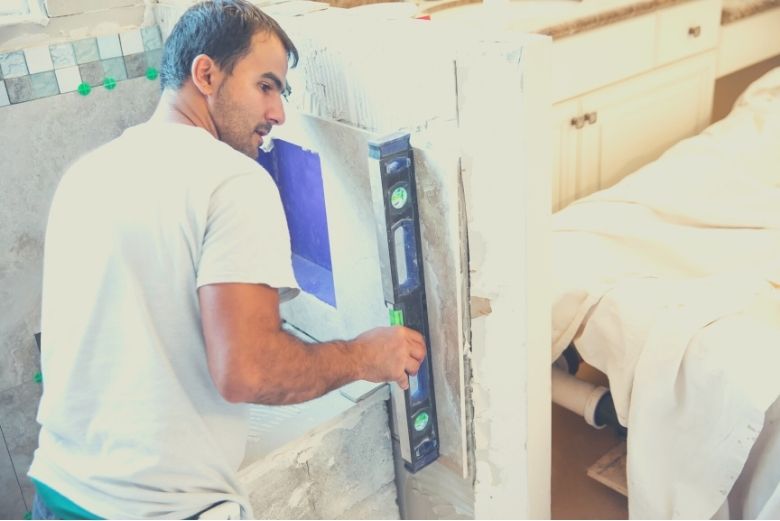
The hardest part about installing Kerdi board is taking the measurements and cutting it to the right size. It’s incredibly easy to work with. It’s similar to cutting drywall, but I don’t have the dusty mess and it even has a grid printed on the surface that I can follow as I cut.
First, measure the area where you want to add it. For me, I was adding it to my shower walls over mold resistant drywall. I measured all three walls and then cut the KERDI-Board to size. I made sure to account for the thickness of the board itself which is 1/2.
Next, I placed the boards in to the shower to check my measurements. I did have to make a few adjustments to some corners and sides, but it fit very snug.
After placing two of the three sides, I cut holes for the water valves. I placed the panel as close as I could to the valves and marked them with a marker. I used the utility knife to score and cut the holes until they fit perfectly.
Next, I mixed the thin-set to a consistency that wasn’t too thick. If I held the trowel at an angle over the bucket, the thin-set would barely slide off. Use that as a guide for the right thickness.
I applied the thin-set completely over the drywall using a notched trowel and then pushed the panel in to place. I used a small piece of cardboard to push so I didn’t indent the panel.
Once in place, that was it! Time to let it dry.
Installing Kerdi Board on Studs
One of the best parts about this product is that I can mount it either directly to studs or over drywall. It works either way and will still keep a watertight seam. However there are some additional requirements if I’m mounting it directly to studs.
The main requirement is that studs must be 12″ on center, not 16″. That means that the fastener horizontal spacing will be no more than 12″ on center.
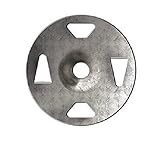
In addition, I have to limit fastener vertical spacing to 12″ on each stud as well. Limiting fastener spacing provides a greater number of fasteners over the entire board and gives additional strength.
Schluter makes these special types of fasteners made for the Kerdi board. The washer is designed to securely hold the board in place due to the grips that extend through the back.

Keep in mind this is the substrate which is going to hold ceramic or porcelain tiles that can be very heavy. The substrate needs the extra strength to stay fastened to the studs and not separate due to the weight.
If you’re thinking the washer creates holes in the board and won’t be water tight, you are correct. But by the end any seam or protrusion will be covered by the Kerdi band to keep the entire system water tight.
Video of Kerdi Shower Kit Steps
Schluter Systems Company Profile
In 1975 Werner Schlüter created a way to make clean tile edges. A master tile installer, Werner valued hard work and consistent results. However he had some ideas that would eventually turn in to a very successful company.
During their first year of business, they had considerable sales because of strong industry advertisements, recommendations, and publications.
Even until today, the company continues to innovate and bring products to market that help installers and homeowners. The company promotes a ‘profile of innovation’ which is the backbone of sustainable growth.
Curated Independent Reviews
56nine is absolutely right. NEVER use schluter or any other products with other products. instant void of warranty. i will never use another shower system besides schluter. weather that be kerdi or kerdi board. absolutely hands down best system ever. this is coming from a guy who has probably had a hand in 150-200 showers over the last 3 years. never ever had one leak.
squidlydiddley on reddit
Coming from a 38-year journeyman tilesetter here:
Cheapest and easiest? Regular drywall on the walls, with Schluter Kerdi membrane and a Schluter shower pan kit.
100% waterproof. Easily applied by a DIY’er and comes with a 10-year warranty.
A much cheaper price-point than Wedi (I’m a certified Wedi installer), much easier than installing Durock (concrete board) and way less of a mess than applying liquid membrane over everything.
MortyBingle on reddit
I used the kerdi board to make the waterproof surround on a tub shower combo. It was super easy to work with vs the cement board, but it is pricey. I did not do too bad on price since I did not need the shower pan. I also got a pre-formed niche. That was extremely easy to work with and I just love the design element with storage.
debbieae on reddit
In Conclusion
I ended up spending more on the Kerdi system than I would have with a traditional cement backer board and mortar system. However the price was worth it to me because of the value it provided. The value was in terms of saving my time, my lack of experience in tiling, and less headache compared to the traditional way.
I definitely recommend this system as a great way to replace an older shower.
- This kit includes: 8 x ½” KERDI-BOARD waterproof building panels covering 101 ft²
- KERDI-BAND waterproofing strip 5” x 98’ 5”
- 2x KERDI-SEAL-PS pipe seals ½” and ¾”, 1x KERDI-SEAL-MV mixing valve seal 4-1/2”
- KERDI-BOARD-ZT/-ZS Screws and washers 140 Pcs Pack (100 Pcs Pack + 40 Pcs Pack)
- 2 tubes of KERDI-FIX sealing and bonding compound in bright white
Prices pulled from the Amazon Product Advertising API on:
Product prices and availability are accurate as of the date/time indicated and are subject to change. Any price and availability information displayed on [relevant Amazon Site(s), as applicable] at the time of purchase will apply to the purchase of this product.